Top 10 Tips for Replacing Golf Cart Brake Pads Easily?

Time:2026-06-07 Author:Mason
0%

Replacing golf cart brake pads might seem daunting. However, with the right approach, it becomes an achievable task. This article focuses on how to replace golf cart brake pads easily. Expertise in this area comes from years of hands-on experience. Understanding your golf cart's brake system is essential for safety and performance.

Effective maintenance is crucial for prolonging the life of your golf cart. Worn brake pads can lead to uneven braking and affect your ride quality. Not every golfer is familiar with brake components. That’s a point of reflection. Recognizing your limitations is the first step toward improvement.

By following clear and concise tips, you can handle this task like a pro. Remember to gather all necessary tools before you begin. Taking it step by step minimizes confusion. Your focus should remain on precision and safety. Each aspect of the process is vital for ensuring reliable braking. Embrace the challenge and learn along the way.

Top 10 Tips for Replacing Golf Cart Brake Pads Easily?

Understanding the Importance of Golf Cart Brake Pads Maintenance

Golf cart brake pads play a crucial role in maintaining safe operation on the course. Regular maintenance can prevent serious accidents. According to industry reports, over 30% of golf cart accidents are linked to brake failure. This highlights the importance of inspecting and replacing brake pads consistently.

When tackling brake pad replacement, remember to check for wear regularly. Signs of wear include squeaking noises or decreased responsiveness. Ensuring that your brake pads are in top condition can save money in the long run. A report by the American Golf Car Association indicates that proper maintenance can extend the life of your cart by 20% or more.

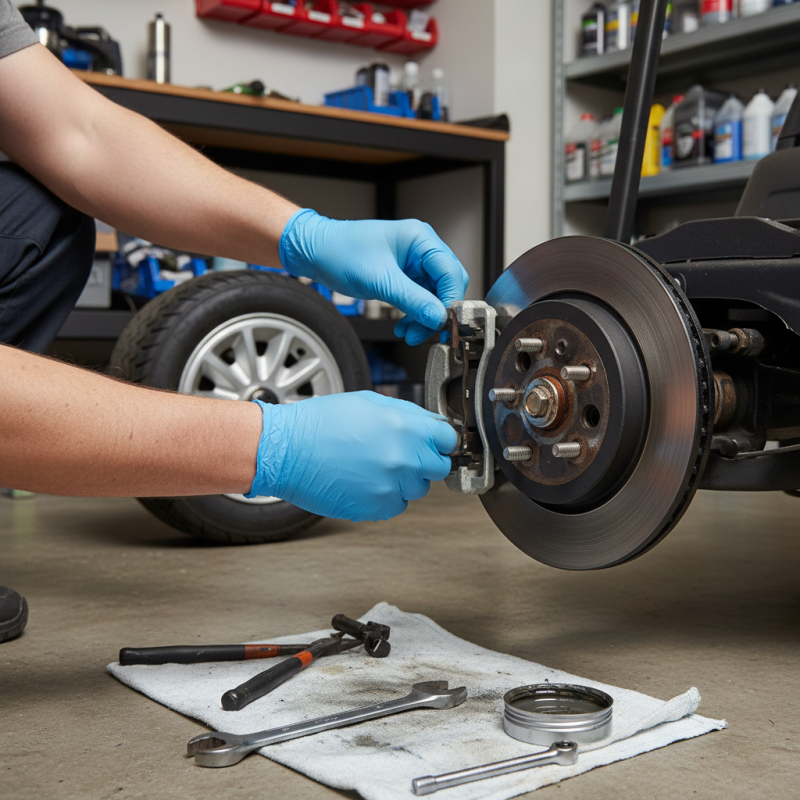
Tip: Always have your tools ready. You’ll need a jack, wrenches, and new brake pads. A well-equipped garage can simplify the replacement process. Another tip: take your time during the replacement. Rushing can lead to mistakes and compromise safety. In the end, investing time in maintenance is better than facing potential problems later.

Recognizing Signs That Your Brake Pads Need Replacement

When it comes to golf cart maintenance, brake pad wear is a common concern. Driving your cart should feel smooth and safe. However, if you notice strange sounds or a longer stopping distance, it might be time to check your brake pads. Squeaking or grinding noises can indicate they are worn out. Pay attention to these signs to ensure safe operation.

Another key sign is a decrease in braking responsiveness. If your cart takes longer to stop, it raises safety concerns. You may also feel vibrations when braking, which often suggests uneven wear. Understanding these signals can prevent accidents and costly repairs. Look for any visible damage as well. Cracks or excessive wear warrant immediate attention. Regular checks allow for timely replacement and maintain overall cart performance. This is crucial for preserving your investment and ensuring a smooth ride.

Top 10 Tips for Replacing Golf Cart Brake Pads Easily

Tip Number Tip Description Signs of Wear
1 Check for Squeaking Sounds Squeak or squeal when braking
2 Inspect Brake Pad Thickness Less than 1/4 inch thickness
3 Look for Cracks or Damage Visible cracks or chips on pad surface
4 Monitor Brake Performance Longer stopping distances observed
5 Perform Regular Maintenance Signs of uneven pad wear
6 Listen for Grinding Noises Metal grinding against metal sounds
7 Check for Brake Fluid Leaks Brake fluid spots under the cart
8 Inspect Brake System Alignment Pulling to one side while braking
9 Check Brake Pedal Feel Soft or spongy brake pedal
10 Consult User Manual for Specifications Follow manufacturer recommendations

Preparing Your Tools and Workspace for Brake Pad Replacement

When preparing to replace the brake pads on your golf cart, creating an efficient workspace is essential. Begin by choosing a spacious area with good lighting. This will help you see clearly while working. Clean the surrounding space to minimize distractions. Remove any clutter that could interfere with your project.

Gather your tools before starting. You will need basic items like a wrench, socket set, and jack. Having everything within reach can save you from unnecessary trips to find tools. Consider using a magnetic tray to hold small parts like bolts and clips. This helps prevent losing essential items during the replacement.

Wearing proper safety gear is also crucial. Use gloves to protect your hands, and ensure that safety glasses are on to shield your eyes. If you're uncertain about your workspace or tools, take time to double-check. Work in a calm and focused manner, allowing yourself to think critically about each step. Remember, a well-prepped area can lead to a smoother repair process. Aim for quality over speed; take breaks if needed. Mistakes happen, and they are part of learning.

Step-by-Step Guide to Removing Old Brake Pads

Replacing golf cart brake pads can feel daunting, but it doesn’t have to be. Knowing the right steps makes this task manageable. Begin by ensuring your golf cart is parked on a flat surface. Use jack stands for safety. Remove the wheels to access the brake pads. Keep in mind that rust and dirt may have built up. A quick clean-up will make the next steps easier.

Next, locate the retaining clips holding the brake pads in place. These can be tricky. Gently pry them off to avoid bending or breaking them. Once the clips are off, you can slide the old pads out. Observe any wear patterns. Sometimes, they can highlight issues that need attention. Feel free to examine the calipers too. If they are dirty or stuck, cleaning them can save you from future problems.

With the old pads gone, installing the new ones is straightforward. Just slide them into place, ensuring they fit correctly. Reattach the retaining clips securely. Remember, not all brake pad materials are equal. It’s vital to choose pads that suit your driving style. After reassembling everything, test the brakes slowly to ensure they function smoothly. Each step matters. Take your time, and don’t rush; this will ensure your safety on the course.

Installing New Brake Pads and Ensuring Proper Functionality

Replacing golf cart brake pads is a task many owners face. Properly installing new pads ensures safety and efficiency. According to a report by the National Golf Cart Association, 30% of golf cart accidents arise from brake failure. Regular maintenance is crucial.

When installing brake pads, start by gathering the right tools. If you find rusted bolts, use a penetrating oil. This detail often gets overlooked. A professional recommends inspecting the entire braking system before replacement. It’s easy to forget about other components, like calipers and rotors.

Once new pads are in place, testing is vital. Drive at low speed and apply the brakes gently. Listen for unusual sounds. Check for responsiveness. If the brakes feel spongy, you may need to bleed the system. Reports indicate that 25% of DIY installations miss this step. Reflection on your installation process can prevent future issues. Always prioritize safety.

FAQS

: Why is maintaining golf cart brake pads important?

: Proper maintenance ensures safe operation and can prevent accidents, as brake failure contributes to over 30% of golf cart accidents.

How can I tell if my brake pads need replacement?

Listen for squeaking noises or notice a longer stopping distance. These signs indicate wear that needs attention.

What tools do I need for brake pad replacement?

Essential tools include a jack, wrenches, and new brake pads. Having tools ready can simplify the process.

How should I prepare my workspace for replacing brake pads?

Choose a spacious, well-lit area and keep it clean. Remove clutter to prevent distractions during the repair.

What safety gear should I wear when replacing brake pads?

Use gloves to protect your hands and safety glasses for eye protection. Safety is key during repairs.

What should I do if I notice brake vibrations?

Vibrations often indicate uneven wear. Check your brake pads for visible damage to prevent accidents and costly repairs.

Why is it beneficial to work patiently during brake replacement?

Rushing increases the risk of mistakes. Taking your time ensures a thorough and safe installation.

How can regular checks of brake pads benefit me?

Regular inspections allow early detection of wear, which can save money and maintain your cart's performance.

What if I’m unsure about any step during brake replacement?

It’s okay to take a moment to reassess. Working thoughtfully can prevent errors and enhance your learning experience.

Conclusion

Replacing golf cart brake pads is a crucial maintenance task that ensures safety and optimal performance on the course. Understanding the importance of maintaining your golf cart’s brake pads can prevent serious issues and help you recognize signs that indicate it's time for a replacement. From unusual noises to reduced braking efficiency, being aware of these warning signs is essential.

To effectively learn how to replace golf cart brake pads, begin by preparing your tools and workspace. After gathering the necessary equipment, follow a clear step-by-step guide to remove the old brake pads and install new ones. Proper installation is vital for ensuring the brake system functions correctly afterward. By following these tips, you can easily perform brake pad replacements and keep your golf cart in top condition.

Mason

Mason

Mason is a seasoned marketing professional with a deep expertise in the company's offerings and a passion for driving brand awareness. With a strong background in digital marketing strategies, he has an innate ability to connect with diverse audiences and effectively communicate product benefits.......