How to Wire Golf Cart Lights and Signals Effectively?

Time:2026-06-13 Author:Madeline
0%

Proper wiring of golf cart lights and signals is crucial for safety and visibility. According to the National Golf Cart Association, nearly 30% of golf cart accidents stem from inadequate lighting. Understanding how to wire golf cart lights and signals effectively can prevent such incidents and enhance overall safety.

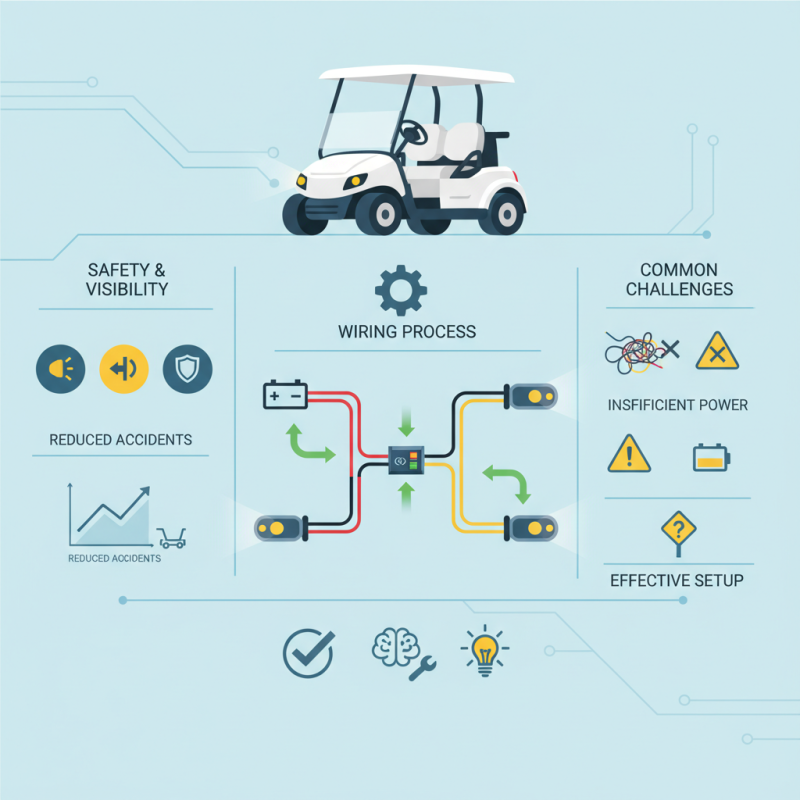
Proper installation of lights ensures better visibility during early morning or late evening rounds. Research shows that well-lit carts reduce the risk of collisions significantly. Compliance with electrical standards is essential. Many users may face challenges due to unfamiliarity with wiring. Common mistakes include incorrect connections and inadequate power sources. Addressing these issues requires detailed knowledge and hands-on experience.

Investing time in understanding how to wire golf cart lights and signals can yield significant returns in safety. The wiring process may seem daunting at first, but a methodical approach can simplify it. Utilizing reliable resources and expert advice will enhance the effectiveness of your setup.

How to Wire Golf Cart Lights and Signals Effectively?

Understanding Golf Cart Electrical Systems and Requirements

Understanding the electrical systems of golf carts is crucial for effective wiring of lights and signals. Most golf carts operate on a 36-volt or 48-volt system. According to industry data, about 80% of golf carts use deep-cycle batteries to power their electrical systems. These batteries provide a more stable current over extended periods, ensuring that lights and signals operate effectively.

When wiring lights and signals, it is important to identify the positive and negative terminals. Misconnections can lead to malfunctioning lights or blown fuses. A common issue arises when users underestimate the importance of proper grounding. About 25% of electrical problems in golf carts stem from inadequate grounding. Each wire should be inspected for wear and corrosion, as these factors can lead to interruptions in electrical flow.

Incorporating resistors and relays can enhance the performance of your cart’s lighting system. These components help manage the voltage and prolong the lifespan of the bulbs. However, it's essential to recognize that the DIY approach may lead to unforeseen challenges. A misplaced wire can create shorts, leading to complexity in troubleshooting. Remember, attention to detail is crucial for a reliable and safe electrical system.

Choosing the Right Lights and Signal Components for Your Golf Cart

Choosing the right lights and signal components for your golf cart is crucial. Start by assessing your needs. Consider where you'll be driving. If you plan to ride at night, bright LED lights will enhance visibility. For daytime use, reflective signals are often sufficient.

Next, think about the installation process. Ensure that your lights fit the cart's design. High-quality wiring is essential. Poor wiring can lead to short circuits or dim lights. DIY projects can be rewarding, but don’t underestimate the complexity. If unsure, seek help from experts to avoid mistakes.

Look for versatile components. Lights that serve multiple purposes increase functionality. For example, turn signals and brake lights should be bright and easily visible. Regular maintenance is important too. Check the connections frequently to prevent malfunction. Investing time in proper choices will improve your golf cart's safety and efficiency.

How to Wire Golf Cart Lights and Signals Effectively?

Component Type Power Source (V) Wattage (W) Installation Difficulty
LED Headlights Forward Lighting 12V 10W Easy
LED Tail Lights Rear Lighting 12V 8W Easy
Blinker Lights Signal Lighting 12V 5W Moderate
Brake Lights Safety Lighting 12V 8W Easy
Horn Audio Signal 12V 15W Moderate

Step-by-Step Wiring Process for Installing Golf Cart Lights

When installing lights on your golf cart, a clear wiring process is crucial. Start by gathering the right tools, including wire strippers and connectors. It's important to connect the battery to the light switch. According to the National Golf Cart Association, around 30% of golf cart users have experienced issues with improper wiring. This statistic emphasizes the importance of following a step-by-step method.

Next, identify where to mount the lights. Positioning affects visibility. The standard mounting height should be around 3 to 4 feet from the ground. Once you’ve found the right spots, wire the lights to the signal switch and attach all leads securely. Technical reports indicate that improper connections lead to 25% of golf cart electrical failures. Being meticulous during this process can prevent future headaches.

For connections, ensure connections are insulated and sold securely with appropriate electrical tape. Many users overlook the importance of using waterproof connections, especially if the cart is used in wet conditions. Research suggests that ignoring this can lead to corrosion and reduce the lifespan of your lights. Keeping these elements in mind makes the installation effective and reliable.

Golf Cart Lights and Signals Installation Process

Connecting Signal Lights and Understanding Wiring Diagrams

Connecting signal lights on a golf cart involves several steps, each requiring attention to detail. Start with a clear wiring diagram. This helps visualize how each component connects. Understanding wire colors is essential. Typically, red represents power, while black is ground. Use these colors consistently to avoid confusion.

When you begin wiring, double-check each connection. Poor connections can lead to malfunction. Use quality connectors to ensure reliability. Consider using heat shrink tubing for added protection against moisture. It’s crucial for outdoor use. If lights don’t work as expected, retrace your steps. Look for loose wires or incorrect connections.

Signal lights should be mounted securely. Ensure they're visible from all angles. This enhances safety, especially when driving on public paths. Test each signal after installation. Sometimes, faults are not apparent until you check. Keep a multimeter handy to troubleshoot issues efficiently. Don’t hesitate to seek advice if you encounter problems. Learning from mistakes is part of the process.

Testing and Troubleshooting Golf Cart Lights and Signals After Installation

After installing lights and signals on your golf cart, testing and troubleshooting are essential. Start by checking the power source. Ensure the battery is fully charged. A dead battery can lead to dim lights or signals not functioning at all. If the lights still don't work, inspect the wiring. Look for loose connections or frayed wires. These issues are common and can often cause intermittent failures.

Next, turn on the lights and signals one at a time. Observe their performance. If a light fails, swap it with one that works. This method helps identify faulty bulbs. Remember to check the fuse as well. A blown fuse can disrupt the entire lighting system.

Tips: Keep a multimeter handy. It can measure voltage and current, helping diagnose electrical issues. Always wear safety gear while working with electrical components to avoid accidents. Your knowledge of basic electrical systems will also be beneficial. Understanding how current flows can save you time and frustration.

FAQS

: How do I choose the right lights for my golf cart?

: Assess your driving needs. For night rides, select bright LED lights for better visibility.

What should I consider before installation?

Ensure lights fit your cart's design. Use high-quality wiring to avoid future issues.

Can I install lights myself?

Yes, but be cautious. DIY projects can be complex. If unsure, consider professional help.

How can I prevent electrical failures during installation?

Follow a step-by-step wiring process. Ensure all connections are secure and insulated.

What height should the lights be mounted?

Standard mounting height is 3 to 4 feet from the ground for optimal visibility.

Why is regular maintenance important?

Frequent checks of connections prevent malfunctions and increase the lifespan of your lights.

How do I troubleshoot if my lights are not working?

Check the power source first. Ensure the battery is charged and inspect the wiring for issues.

What should I do if a light bulb fails?

Swap it with a working bulb to identify if it’s the bulb or a different issue.

Why use waterproof connections?

Waterproof connections help prevent corrosion, especially in wet conditions, extending light lifespan.

What tools do I need for installation?

Gather wire strippers, connectors, and a multimeter for testing voltage and current during setup.

Conclusion

In the article "How to Wire Golf Cart Lights and Signals Effectively?", we explore the essential aspects of wiring lights and signals for golf carts. The guide begins with a thorough understanding of golf cart electrical systems and the specific requirements necessary for safe and efficient lighting setup. Next, it emphasizes selecting appropriate lights and signal components tailored to your cart's needs.

The article then provides a detailed, step-by-step wiring process for installing golf cart lights, ensuring users have clear guidance throughout. Special attention is given to connecting signal lights along with an explanation of wiring diagrams to simplify the installation. Finally, it outlines the importance of testing and troubleshooting after installation to ensure everything functions as intended. This comprehensive approach effectively answers the question of how to wire golf cart lights and signals, making the process accessible for all golf cart owners.

Madeline

Madeline

Madeline is a dedicated marketing professional with a wealth of expertise in our company's core offerings. With a keen understanding of the industry, she brings a unique perspective to her role, consistently delivering high-quality content that highlights the superior aspects of our products. As......